In this post you can learn how to create your own jekyll theme
目录
- Set up the Jekyll environment
- Run the Jekyll server
- Github Pages localization
- Set up the environment on Windows
- You need a Web Prototype
- What is Jekyll
- How markdown Works in Jekyll
- How highlight Works in Jekyll
- Create the Jekyll Theme
- What else did I do
- Upload your theme to JekyllThemes
- References
Set up the Jekyll environment
- install ruby
sudo apt-get install ruby - install the Jekyll ruby gem
sudo gem install jekyll - install the kramdown ruby gem
sudo gem install kramdown - install the rouge ruby gem
sudo gem install rouge - test Jekyll
jekyll --version
From above you can know all these are base on ruby language
Run the Jekyll server
- new a jekyll theme
jekyll new mytheme - run the server
cd mytheme
jekyll server - visit 127.0.0.1:4000
Github Pages localization
After Pushing the jekyll theme to github pages, the site would run on the github server which is different with the local environment. It may cause some display problems. So it’s recommended to set up the github pages environment locally.
- update ruby to 2.0.0 or higher
ifruby --versionis not higher than 2.0.0,you need to update it - install the Bundler
sudo gem install bundler - create a file called
Gemfilein the jekyll theme root directory - add these text to the
Gemfile
source 'https://rubygems.org'
gem 'github-pages', group::jekyll_plugins - install the Github Pages tool sets
bundle install - run
bundle exec jekyll serve
More About Github Pages Localization, See github-helper-setting-up-your-github-pages-site-locally-with-jekyll
If bundle exec jekyll serve is ok but jekyll serve is failed, you can delete the Gemfile and the Gemfile.lock then run jekyll serve again.
Set up the environment on Windows
- install the ruby and devkit for windows
download ruby for windows, it’s better to install ruby 2.0.0 or higher。
you need to install the ruby-devkit too ! - set up the command line environment variable
generally the installer would do this for you, but you also can add it by yourself. AddC:\Ruby22\bin;to the windows environment variablepath. - install Jekyll
gem install jekyll
if not found the command, runset a = band try it again. maybe the variable was not active. - install bundler
gem install bundler - github pages Localization
create aGemfileand add the text above
bundle install - run
bundle exec jekyll server
on windows command line
command gem is the gem.bat
You need a Web Prototype
The current blog only has three pages:index.html、article.html and post.html.
If you already had the web prototype, you can merge into the jekyll theme now.
What is Jekyll
Jekyll is a static blog system, it dose not has the database and comment modules.
jekyll is writable before run and is read-only when running.
How markdown Works in Jekyll
this is a markdown text:
## Markdown Demo

This is a `markdown` demo

> try it
After a markdown converter we got the html:
<h2>Markdown Demo</h2>
<p>This is a <code>markdown</code> demo</p>
<blockquote>
    <p>try it</p>
</blockquote>
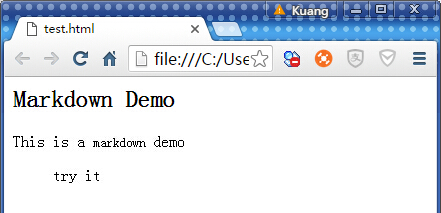
We directly open it with a browser:

Yet, it dose not has any visual effects.
Markdown text is only converted to html text,it has no any style-sheet !
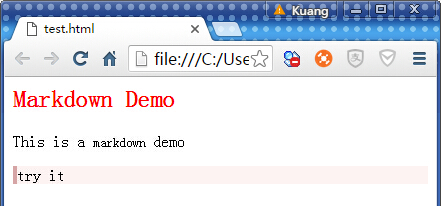
For pretty view, we add the following style-sheet:
<style>
h2 {
	color: red;
}
blockquote {
	background-color: #fef3f3;
	border-left: 4px solid #d6a6a6;
	margin: 0;
}
</style>
Yes, now we got a more beautiful page:

Summary
- markdown converter converts the markdown text to html plain text
- there is a css file for markdown in the Jekyll theme
How highlight Works in Jekyll
this is a markdown code block:
 ```css
  <style>
through language highlighter [rouge](https://github.com/jneen/rouge),we got the html text:
```html
<div class="language-css highlighter-rouge">
<pre class="highlight">
<code>
<span class="o"><</span>
<span class="nt">style</span>
<span class="o">></span>>
</code>
</pre>
</div>
rouge has a style sheet called rouge.css:
.highlight {
  color: #D53FB7;
}
.highlight .o {
  color: #f92672;
}
.highlight .nt {
  color: #f92672;
}
This is why the language can highlight by strings variables or keywords
Summary
- highlighter converts the code language with different selector
- there is a css file for highlight in the Jekyll theme
Tips how to get the rouge.css
$ rougify foo.rb
$ rougify style monokai.sublime > rouge.css
you can found these in the rouge site
Create the Jekyll Theme
new a theme
jekyll new mytheme
the Jekyll theme structure
use tree command to see the root directory
├── index.html
├── about.md
├── _config.yml       # Jekyll config file
├── feed.xml
├── Gemfile           # Github Pages Localization File
├── Gemfile.lock      # Github Pages Localization File
├── _sass
│   ├── _base.scss                  # markdown css
│   ├── _layout.scss
│   └── _syntax-highlighting.scss   # highlight css
├── css
│   └── main.scss           #
├── _includes
│   ├── footer.html         # html segment
│   ├── header.html         #
│   ├── head.html           #
│   ├── icon-github.html    #
│   ├── icon-github.svg     # github icon
│   ├── icon-twitter.html   #
│   └── icon-twitter.svg    # twitter icon
├── _layouts
│   ├── default.html        # default layout
│   ├── page.html           # page layout
│   └── post.html           # post layout
├── _posts
│   └── 2016-08-24-welcome-to-jekyll.markdown
└── _site             # The Release Jekyll Site
    ├── about
    │   └── index.html
    ├── css
    │   └── main.css  # all the css above merge to this
    ├── feed.xml
    ├── Gemfile
    ├── Gemfile.lock
    ├── index.html
    └── jekyll
        └── update
            └── 2016
                └── 08
                    └── 24
                        └── welcome-to-jekyll.html
Simplify the theme
remove unnecessary files, Simplify the theme:
├── index.html
├── _config.yml       # Jekyll config file
├── feed.xml
├── Gemfile           # Github Pages Localization File
├── Gemfile.lock      # Github Pages Localization File
├── css
│   └── markdown.css    # extract markdown css from _site/css/main.css
│   └── highlight.css   # extract highlight css from _site/css/main.css
├── _includes
├── _layouts
│   └── post.html       # post layout
├── _posts
│   └── 2016-08-24-welcome-to-jekyll.markdown
Deeper in Jekyll
the _layouts Directory
the file in this directory is ”include” others.
the _includes Directory
the file in this directory is “be included” by others.
the include expression: {% include head.html %}
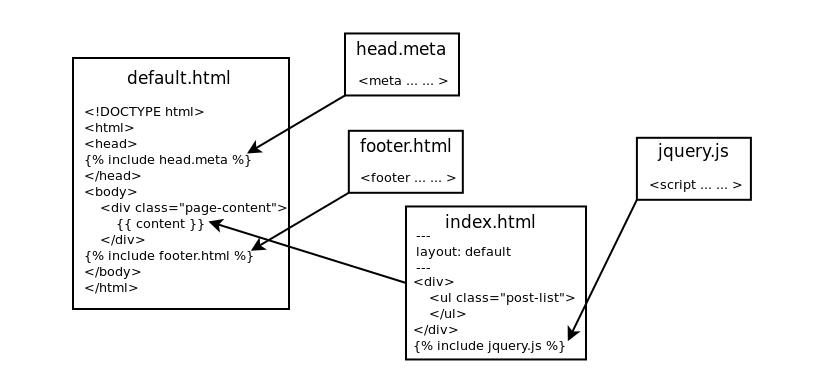
the releationships between _layouts 、_includes and the html pages:

NOTE:
contentin default.html is different withpage.contentorpost.content, the former is the html text after converted but the latters are source markdown text!
the _config.yml File
the most important file in Jekyll, you can store data, set the jekyll plugins or set up the runtime environment.
# set a variable
domain: "http://jokinkuang.info" # the domain URL for your site

# config
excerpt_separator: "\n\n" # you can specify your own separator here, default is "\n\n" String
permalink: /:year/:month/:day/:title.html
highlighter: rouge  # use rouge as highlighter
markdown: kramdown  # use kramdown as markdown convertor
kramdown:
  input: GFM
  hard_wrap: true # a newline in markdown text would be changed to <br>
gems:
  - jemoji # if need Github Emoji you have to add it

# the Github would set up when upload to Github Pages,See:Github Help With Configuring Jekyll

# Github Pages default settings, you can Override here !
# kramdown:
#   input: GFM
#   hard_wrap: false
# gems:
#   - jekyll-coffeescript
#   - jekyll-paginate

# Github Pages settings which you can NOT Override !
# lsi: false
# safe: true
# source: [your repo's top level directory]
# incremental: false
# highlighter: rouge
# gist:
#  noscript: false
# kramdown:
#  math_engine: mathjax
New a Page
| Way 1 | add xxx.html in jekyll-root,site path is /xxx.html |
| Way 2 | add xxx/index.html in jekyll-root,site path is /xxx,No need postfix |
the front matter in page
Every page has its own YAML front matter, which can create variables or override the variables in _config.yml
---
layout: post
title: step by step
categories: [jekyll github markdown rouge]
date: 2016-9-3 15:47:05
excerpt: ""   # override the post's default excerpt
pid: ""       # new a pid variable
---
the site Variable
the site variable can access variables in _config.yml or Jekyll:
| site.posts | a posts collections from new to old |
| site.categories | categories and posts Map{cate1:[post1, post2], cate2:[post3, post4]} |
| site.tags | tags and posts Map{tag1:[post1, post2], tag2:[post3, post4]} |
| site.XXX | variables define in _config.yml |
the page Variable
the variable refer to current page, for example, in index.html, page is the index.html page, you can access the front matter in index.html:
| page.content | page source(markdown text) |
| page.title | page title |
| page.excerpt | excerpt source |
| page.url | the relative path |
| page.date | the date |
| page.categories | the categories array,linux/ruby/_posts/ruby.md would merge linux and ruby into categories,NOTE page.categories is different with site.categories! |
| page.tags | the tags array |
| page.path | the path in source directory(source path) |
NOTE:the post in site.posts is almost the same as page variable
the Liquid Language
if you want to do some logic operation, you need to learn the Liquid language
-
show the value of a variable
{{ variable }}combine a string:
"head{{ variable }}tail"or use Filter:
{{ "head" | append : variable | append : "tail" }} -
assign
{% assign titleAndDate = page.title | append: page.date %}assign x = yto create axvariable,when assign you have to assign a value!xxx | append: "str"is Liquid’s Filter, just likeobject | method:parameter -
if
{% if site.title == "" %} {% assign title = "A" %} {% elsif site.title == "stepbystep" %} {% assign title = "B" %} {% else %} {% assign title = "C" %} {% endif %} -
for
{% for post in site.posts %} {% assign title = post.title %} The post title is {{ title }} {% endfor %} -
access map’s key and value
likesite.categories, access the category calledlinuxhas two ways:
Way 1:site.categories.linuxis the posts list of linux category
Way 2:for cate in site.categories,cate[0]is linux,cate[1]is the posts list
NOTE:{% %} can not break line
What else did I do
Database File
Jekyll dose not has database, but just like most feed.xml in jekyll themes, it just like a database file. Therefore, we can create a postfile to load all data we need and then get it by javascript when requesting the html page.
A Postfile formatted with json:
{
  "posts":
  [
  {
     "title": "step by step to create a Jekyll theme",
     "words": "1932",
     "author": "jokin",
     "date": "2016-09-03 23:47:05",
     "url": "/2016/09/03/how-to-create-the-jekyll-theme.html",
     "pid": "20160903-154705",
     "image": "/w3c/images/jekyll.jpg",
     "categories": ["jekyll"],
     "excerpt": "learn how to create the jekyll theme..."
   }
   , {... ...}
  ]
}
Liquid Syntax:
{
  "posts":
  [
  {% for post in site.posts %}
    {
      "title": "{{ post.title }}",
      "words": "{{ post.content | number_of_words }}",
      "author": "{{ site.author }}",
      "date": "{{ post.date | date:"%Y-%m-%d %H:%M:%S" }}",
      "url": "{{ post.url }}",
      "pid": "{{ post.pid }}",
      "categories": [
        {% for cate in post.categories %}
          "{{ cate }}"
        {% endfor %}
      ]
      ......
    }
  {% endfor %}
  ]
}
A category a page
Usually the categories html page in jekyll theme is one page:
linux
    - shell
mac
    - ios
    - xcode
windows
    - windows API
Because we only can loop it like this:
{% for cates in site.categories %}
{{ cates[0] }}
  {% for post in cates[1] %}
    {{ post.title }}
  {% endfor %}
{% endfor %}
If we want a category a page, we can not loop. we have to add the new category page hand by hand.
But with upper postfile we can do that with javascript at the fore-end in browser.
We can loop it in browser to show the posts of the selected category.
Subdirs as Categories
Jekyll default supports that /windows/api/_posts/2016-9-22-category.md, the windows and api would be merged into the post categories.
But why not _posts/windows/api/2016-9-22-category.md.
We can use Liquid script to implement this feature. In page variable, page.path refers to the source path string _posts/windows/api/2016-9-22-category.md, we can split it to get the subdirs we want.
But note that, after that we can not access the post.categories or site.categories directly, cause the subdirs are not include.
Liquid script to get the post’s categories
Liquid script to get the site’s categories
Upload your theme to JekyllThemes
References
| Read·Jekyll Chinese | English | |
| Read·Liquid Doc1 | Doc2 | Doc3 |
| Read·highlighter rouge Doc | ||
| Read·Markdown convertor kramdown (support maruku) | ||
| Read·Markdown convertor maruku (support TOC) |

